Learning where you are looking at (in the browser)
Updated 29 JAN 2020: Updated TFJS version to 1.5 and fixed an issue
Today, let’s talk about how to learn a complex computer vision problem right in the browser! Thanks to TensorFlow’s JavaScript Library, this is easy to realize. Instead of training our own model and serving it as a finished product, we will let the user collect their own data and then train the model right there, on the client machine. Absolutely no server is neccessary!
Try out the complete project here. This requires a modern browser, a webcam, and a mouse. I did not have the time to tweak this to work on tablets/phones 😨. And of course, things get much harder when the camera is not stationary.
The Idea
Let’s predict where on the website a user is looking at by watching their eyes through the webcam!
In the browser, we can easily get access to the user’s webcam. Taking the whole image would be too large an input for the net, and it would have to do a lot of work before it could even find out where the eyes are. This might be fine in a model that we train offline and deploy on a server, but to be trained and used in the browser, this would be too daunting a task.
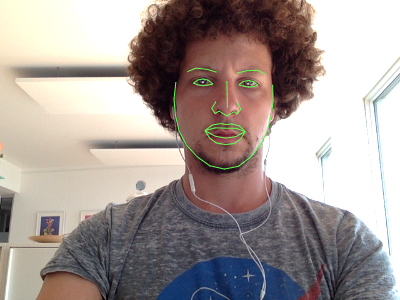
In order to help the network, we can provide it with only the part of the image around the user’s eyes. This rectangle surrounding the eyes can be located using a third party library. So the first part of the pipeline looks like this:
The JS library I use to detect and locate the face is called clmtrackr. It’s not perfect, but pretty lightweight, fast and overall great out of the box.
With only this small but relevant image as input, a simple convolutional neural network shouldn’t have much trouble learning the problem:
This blog post describes a fully working but minimal version of this idea. To see the complete thing in action with many additional features, check out my GitHub repository.
Preparation
First off, download clmtrackr.js from its repository. We will start with an empty HTML file that only imports jQuery, TensorFlow.js, clmtrackr.js and a main.js that we will be working on later:
<!doctype html>
<html>
<body>
    <script src="https://code.jquery.com/jquery-3.3.1.min.js"></script>
    <script src="https://cdn.jsdelivr.net/npm/@tensorflow/tfjs@1.5.0"></script>
    <script src="clmtrackr.js"></script>
    <script src="main.js"></script>
</body>
</html>
Streaming from the webcam
We need to get the user’s permission to activate the webcam and render its video stream to the page. In this tutorial, I’m skipping a lot of backwards-compatibility-related boilerplate code. We’ll simply assume that our users are surfing on the latest Chrome 😁
First, add this to your HTML (inside the body but above the script tags):
<video id="webcam" width="400" height="300" autoplay></video>Now let’s start with our main.js:
$(document).ready(function() {
  const video = $('#webcam')[0];

  function onStreaming(stream) {
    video.srcObject = stream;
  }

  navigator.mediaDevices.getUserMedia({ video: true }).then(onStreaming);
});
Try it out! Your browser should be asking for permissions, then stream your face live onto the page.
We can add more code to the onStreaming() function later on.
Finding your face
Next, let’s use clmtrackr.js to find your face in the video. First, initialize the tracker right underneath const video = ...:
const ctrack = new clm.tracker();
ctrack.init();
Now in onStreaming(), we can let the tracker work on the video stream by adding:
ctrack.start(video);And that’s it! Your face should be detected!
… don’t believe me? Okay, let’s draw a shape around your face to prove it.
For that, we need a way to draw over the video element. Drawing in general is done via the <canvas> tag in HTML. So we need to create an overlayed canvas element right on top of the video.
Inside the HTML, add this under the existing <video>-element:
<canvas id="overlay" width="400" height="300"></canvas>
<style>
    #webcam, #overlay {
        position: absolute;
        top: 0;
        left: 0;
    }
</style>
(Feel free to move the inline style to a dedicated stylesheet).
This adds a canvas with the same size. The CSS guarantees that they are exactly at the same position.
Now each time the browser renders, we want to draw something to the canvas. Running a method at each frame is done via requestAnimationLoop(). Before we draw something to the canvas, we should remove the current content by clearing it. Then finally we can tell clmtrackr to draw straight to the canvas.
Here’s the code. Add it underneath ctrack.init():
const overlay = $('#overlay')[0];
const overlayCC = overlay.getContext('2d');

function trackingLoop() {
  // Check if a face is detected, and if so, track it.
  requestAnimationFrame(trackingLoop);

  let currentPosition = ctrack.getCurrentPosition();
  overlayCC.clearRect(0, 0, 400, 300);

  if (currentPosition) {
    ctrack.draw(overlay);
  }
}
Now call trackingLoop() inside onStreaming() right after ctrack.start(). It will re-run itself at each frame.
Refresh your browser. Your face should get a funny green mask in the video. Sometimes you have to move around a bit for it to capture your face correctly.
Cropping the eyes
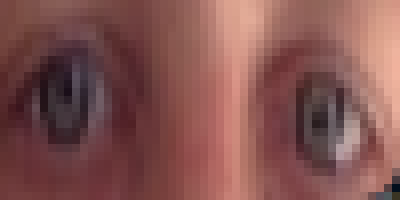
Next, we need to crop a rectangle around the eyes and put it in a separate canvas.
Luckily, cmltracker gives us the location of not only the face, but of 70 facial features. By looking at their docs, we can select the exact points we’re looking for:
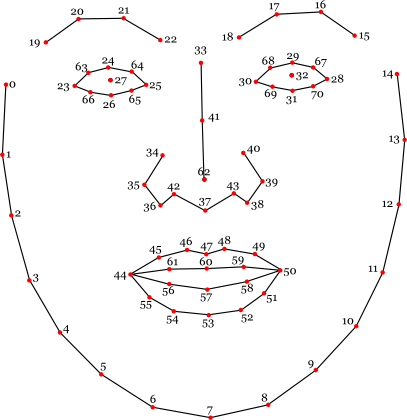
Let’s define the eyes as the rectangle touching points 23, 28, 24 and 26, expanded by 5px in each direction. This rectangle should cover everything important as long as the user doesn’t tilt their head too far (or is standing on their head 🙃).
We need another canvas to capture this cropped image before we can use it. It can simply be set to 50x25 pixels. Don’t worry, the actual rectangle will resize to fit in there. A little bit of deformation is okay.
Add this new eyes-canvas to the HTML:
<canvas id="eyes" width="50" height="25"></canvas>
<style>
    #eyes {
        position: absolute;
        top: 0;
        right: 0;
    }
</style>
This function will return the x, y coordinates and width and height of the rectangle surrounding the eyes. It takes as input the position-array we get from clmtrackr. Note that each position we get from clmtrackr has an x and a y component. Add it to your JS file:
function getEyesRectangle(positions) {
  const minX = positions[23][0] - 5;
  const maxX = positions[28][0] + 5;
  const minY = positions[24][1] - 5;
  const maxY = positions[26][1] + 5;

  const width = maxX - minX;
  const height = maxY - minY;

  return [minX, minY, width, height];
}
So now in each frame, we want to extract the eyes rectangle, stroke it in red in the overlay canvas, then copy it over to the new eyes canvas. Note that the video might have a different resolution internally and so we add some resizing factors for that.
Replace the if-block inside trackingLoop():
if (currentPosition) {
  // Draw facial mask on overlay canvas:
  ctrack.draw(overlay);

  // Get the eyes rectangle and draw it in red:
  const eyesRect = getEyesRectangle(currentPosition);
  overlayCC.strokeStyle = 'red';
  overlayCC.strokeRect(eyesRect[0], eyesRect[1], eyesRect[2], eyesRect[3]);

  // The video might internally have a different size, so we need these
  // factors to rescale the eyes rectangle before cropping:
  const resizeFactorX = video.videoWidth / video.width;
  const resizeFactorY = video.videoHeight / video.height;

  // Crop the eyes from the video and paste them in the eyes canvas:
  const eyesCanvas = $('#eyes')[0];
  const eyesCC = eyesCanvas.getContext('2d');

  eyesCC.drawImage(
    video,
    eyesRect[0] * resizeFactorX, eyesRect[1] * resizeFactorY,
    eyesRect[2] * resizeFactorX, eyesRect[3] * resizeFactorY,
    0, 0, eyesCanvas.width, eyesCanvas.height
  );
}
With this, you should see a red rectangle around your eyes and that part cropped onto a second
canvas. If your eyes are bigger than mine, toy around with the getEyesRectangle function.
Collecting data
There are many ways to collect data. I decided to use the mouse in conjunction with the keyboard. The user moves the cursor over the page, following it with their eyes, and hits the space key whenever an example should be recorded. That way, it is easy to create a large dataset quickly.
Tracking mouse movement
To know where in the window the mouse is located at any time, we need to add an event listener to document.onmousemove. This function also normalizes the coordinates to be within [-1, 1]:
// Track mouse movement:
const mouse = {
  x: 0,
  y: 0,

  handleMouseMove: function(event) {
    // Get the mouse position and normalize it to [-1, 1]
    mouse.x = (event.clientX / $(window).width()) * 2 - 1;
    mouse.y = (event.clientY / $(window).height()) * 2 - 1;
  },
}

document.onmousemove = mouse.handleMouseMove;
Capturing images
In order to capture an image from a canvas and store it as a tensor, TensorFlow.js offers the helper function tf.browser.fromPixels(). Let’s use it to store and then normalize an image from our eyes canvas:
function getImage() {
  // Capture the current image in the eyes canvas as a tensor.
  return tf.tidy(function() {
    const image = tf.browser.fromPixels($('#eyes')[0]);
    // Add a batch dimension:
    const batchedImage = image.expandDims(0);
    // Normalize and return it:
    return batchedImage.toFloat().div(tf.scalar(127)).sub(tf.scalar(1));
  });
}
Note that tf.tidy() makes TensorFlow.js clean up our mess after we’re done.
We could simply store all examples in one big training set, but in machine learning it is important to make sure that your model is not just learning the data by heart. That’s why we should save some examples in a separate validation set. Then we can check how the model fares on unseen data and make sure it’s not overfitting to the training set. For this, I split off 20% to go into the validation set.
Here’s the code to add new data points:
const dataset = {
  train: {
    n: 0,
    x: null,
    y: null,
  },
  val: {
    n: 0,
    x: null,
    y: null,
  },
}

function captureExample() {
  // Take the latest image from the eyes canvas and add it to our dataset.
  tf.tidy(function() {
    const image = getImage();
    const mousePos = tf.tensor1d([mouse.x, mouse.y]).expandDims(0);

    // Choose whether to add it to training (80%) or validation (20%) set:
    const subset = dataset[Math.random() > 0.2 ? 'train' : 'val'];

    if (subset.x == null) {
      // Create new tensors
      subset.x = tf.keep(image);
      subset.y = tf.keep(mousePos);
    } else {
      // Concatenate it to existing tensors
      const oldX = subset.x;
      const oldY = subset.y;

      subset.x = tf.keep(oldX.concat(image, 0));
      subset.y = tf.keep(oldY.concat(mousePos, 0));
    }

    // Increase counter
    subset.n += 1;
  });
}
Finally, we need to bind this function to the space key:
$('body').keyup(function(event) {
  // On space key:
  if (event.keyCode == 32) {
    captureExample();

    event.preventDefault();
    return false;
  }
});
Now, each time you hit space, an image with the corresponding mouse position should be added to one of the datasets.
Training a model
Let’s create a simple convolutional neural network. TensorFlow.js provides a Keras-like API for this. The network should have a conv layer, max-pooling, and finally a dense layer with two output values (the screen coordinates). In between, I added dropout as a regularizer and flatten to convert 2D-data into 1D. Training is done with the Adam optimizer.
I arrived at these values after toying around on my MacBook Air. Feel free to experiment with them or to add more layers!
Here’s the code for the model:
let currentModel;

function createModel() {
  const model = tf.sequential();

  model.add(tf.layers.conv2d({
    kernelSize: 5,
    filters: 20,
    strides: 1,
    activation: 'relu',
    inputShape: [$('#eyes').height(), $('#eyes').width(), 3],
  }));

  model.add(tf.layers.maxPooling2d({
    poolSize: [2, 2],
    strides: [2, 2],
  }));

  model.add(tf.layers.flatten());

  model.add(tf.layers.dropout(0.2));

  // Two output values x and y
  model.add(tf.layers.dense({
    units: 2,
    activation: 'tanh',
  }));

  // Use ADAM optimizer with learning rate of 0.0005 and MSE loss
  model.compile({
    optimizer: tf.train.adam(0.0005),
    loss: 'meanSquaredError',
  });

  return model;
}
Before training the network, we set a fixed epoch number and a variable batch size (since we might be dealing with very small datasets).
function fitModel() {
  let batchSize = Math.floor(dataset.train.n * 0.1);
  if (batchSize < 4) {
    batchSize = 4;
  } else if (batchSize > 64) {
    batchSize = 64;
  }

  if (currentModel == null) {
    currentModel = createModel();
  }

  currentModel.fit(dataset.train.x, dataset.train.y, {
    batchSize: batchSize,
    epochs: 20,
    shuffle: true,
    validationData: [dataset.val.x, dataset.val.y],
  });
}
Let’s add a button on the page to trigger this:
<button id="train">Train!</button>
<style>
    #train {
        position: absolute;
        top: 50%;
        left: 50%;
        transform: translate(-50%, -50%);
        font-size: 24pt;
    }
</style>
And JS:
$('#train').click(function() {
  fitModel();
});
Time to predict!
Now that we can collect a dataset and have a model set up, we can start predicting where the user is looking at. Let’s display this with a green sphere that moves over the screen.
First, let’s add the sphere by itself:
<div id="target"></div>
<style>
    #target {
        background-color: lightgreen;
        position: absolute;
        border-radius: 50%;
        height: 40px;
        width: 40px;
        transition: all 0.1s ease;
        box-shadow: 0 0 20px 10px white;
        border: 4px solid rgba(0,0,0,0.5);
    }
</style>
To move the sphere, we periodically pass the current eyes image to the the neural network and ask “Where are they looking at?”. The model answers with two coordinates where we should move the sphere to:
function moveTarget() {
  if (currentModel == null) {
    return;
  }
  tf.tidy(function() {
    const image = getImage();
    const prediction = currentModel.predict(image);

    // Convert normalized position back to screen position:
    const targetWidth = $('#target').outerWidth();
    const targetHeight = $('#target').outerHeight();

    // It's okay to run this async, since we don't have to wait for it.
    prediction.data().then(prediction => {
      const x = ((prediction[0] + 1) / 2) * ($(window).width() - targetWidth);
      const y = ((prediction[1] + 1) / 2) * ($(window).height() - targetHeight);

      // Move target there:
      const $target = $('#target');
      $target.css('left', x + 'px');
      $target.css('top', y + 'px');
    });
  });
}

setInterval(moveTarget, 100);
I set the interval to be 100 ms. If your computer is slower than mine, you might want to increase that.
Done!
Alright! We have implemented all the moving parts.
Try them out: Move your mouse over the browser window, follow it with your eyes, and spam the space key. Then hit the train button from time to time. The green sphere should start following your eyes around! It may be bad in the beginning, but starting at around ~50 training examples, repeated training and some luck, it should get pretty good.
Find the complete code of this tutorial here.
While this is quite cool already, there is much room for improvement! What if the user moves their head or changes their posture? It would be great to have some additional features, like the size, position and angle of the eyes rectangle. These and many more ideas I added to the code in my repository. You can try out the full version here and look at the code here. Some of the additional features I built:
- Additional features as mentioned above
- Convert images to grayscale
- CoordConv (info)
- Heatmap to check where the model succeeds or fails
- Ability to save/load the dataset
- Ability to save/load the model
- Retain weights with lowest validation loss after training
- Better UI with a short tutorial
Thanks for reading! Please leave your comments, feedback and ideas below.